More IoT switch fun with Sonoff and Tasmota
I was looking at Tomas Blog a while ago, when he mentioned that he had bought a couple of the Sonoff WIFI switches to do some outdoor LED lighting.
Sadly, the current default firmware that comes with the Sonoff switches no longer allows OTA firmware upgrades, so you have to do it with a serial adapter. I got mine from SparkFun, which took AGES to get here, but works perfectly. Just make sure it's 3.3v not 5 (most can do both). Takes about the same amount of time as OTA.
They sounded like they were quite good, and fairly cheap, too. I already have a few Wemo switches, which are very good so far, as well as a few other bits, but I specifically wanted something to control the spa, which has a simple time-based on/off timer.
Problem is, it's running a heater and a pump, so the draw is rather more than the 2.4kw that a 10A Wemo can handle - it needs at least 16A.

Doing a bit of a google around for something else, I found that Sonoff have a 16A switch - the TH16 - which is what I need for the spa. Conveniently, it also comes with a waterproof thermometer. So I picked one up from AliExpress for $11 + a waterproof temperature sensor and temperature+humidity sensor. Not bad for $20.
Last week, they turned up - turns out Ali Express is quite quick, sometimes. I grabbed a spare, old extension lead, stripped it back, and wired it up - the TG16 doesn't have a normal plug, just terminals which you can connect wires to.
Once it was wired up, I plugged it in, grabbed their app, and gave it a try. It worked pretty well out of the box with usual flow - SSID, password, username and password.....
.... wait a moment. It appears these will only work with an internet connection, and they have to talk via the ITEAD/Sonoff cloud service. So yeah. Someone else, out there, has direct access to turning things on and off. And if they go away, all my devices stop working.
While there does appear to be a homebridge plugin which will use it, I don't really like this model very much. Plus their app is a bit naff.
I had a look around at other stuff - I can run a local server, sort of. But they can also be reflashed with an open source firmware called Tasmota, which supports HTTP, MQTT, all the sensors, and doesn't need to communicate out at all.
Sounds good.
Only problem is, normally you have to break them open and plug in a serial port thing. Rather beyond my electronics skill level.
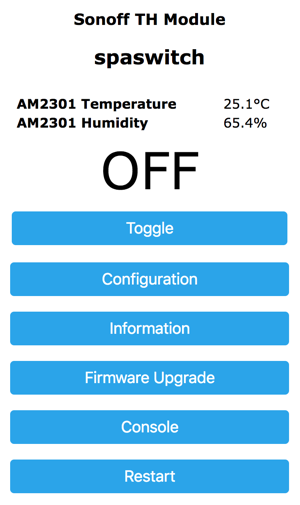
Then I came across SonOTA, which is a python app which does the various steps to do a local over-the-air (OTA) firmware upgrade - adding the device to the local wifi, loading the updated firmware, rebooting etc. Once it's done (about 5 mins or so), you get the basic, but very functional, Tasmota interface.
Note that for one of the switches, the very basic one, iTEAD have prevented OTA upgrades. Not good :(
The steps are pretty simple. Turn off your local firewall (as they listen to a few ports during the process), make sure you have only one network connection, then run python3 sonota.py and follow the prompts.
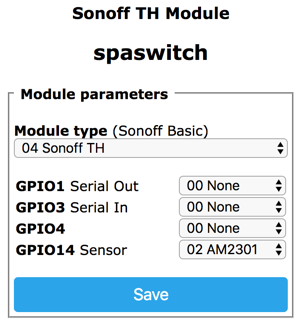
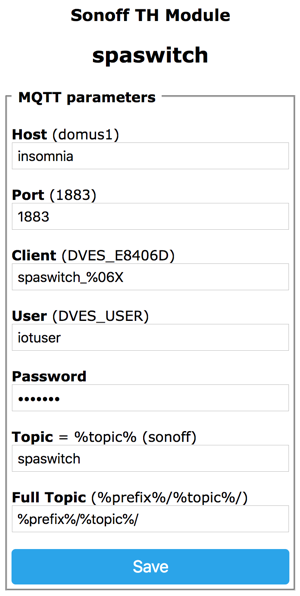
After a few reboots, and a check of the router to work out the IP, I'm into the new interface. It has a load of settings, but the main ones I want are the sensor (Configuration -> Module -> Set it as a TH16, and add the correct type of sensor in the gpio14 dropdown), and the MQTT configuration.
Next step is a MQTT broker. This is kind of like a message queue, but designed for IoT stuff. It works over HTTP and websockets, so the clients can be very low powered and uncomplicated, and have the broker handle most of the rest of the communications, polling etc. It's also an open standard, so lots of systems support it, including AWS.
I googled around a bit, again, and found Mosquitto, which is from Eclipse. They have a basic Docker container, which I modified to use 1.4.15 and also to set the directories and permissions in the startup script.
Once that was up, I could see in the logs that the switch was talking to server. Now for the other end of the connection.
Side note: I didn't bother setting up a username+password in mosquitto. I'll most likely do it in the future, but the machine isn't on the internet, and never will be, so until I get all of this sorted out, I'm ok with no username + password. But it can and does support authentication, and you should use it.
The last step is to get the homebridge side setup. There are a set of plugins which supports the MQTT interface, and they work quite nicely:
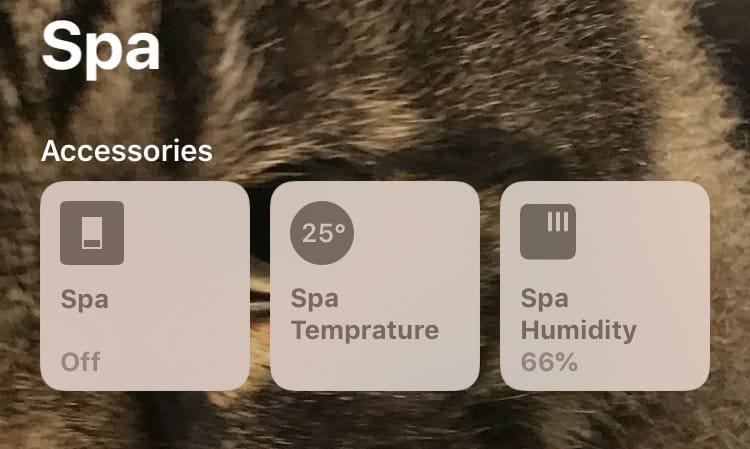
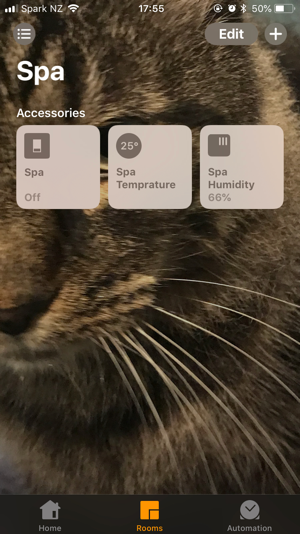
The configuration is pretty much normal homebridge. Replace your server name, add a username+password if you have one, and rename spaswitch with the topic name of your device. The Name can be anything, that's what shows up in HomeKit.
...
"accessories":[
{
    "accessory": "mqtt-switch-tasmota",

    "name": "Spa",

    "url": "mqtt://(servernamehere)",
    "username": "",
    "password": "",

    "topics": {
        "statusGet": "stat/spaswitch/POWER",
        "statusSet": "cmnd/spaswitch/POWER"
    },
    "manufacturer": "ITEAD",
    "model": "Sonoff TH"
},
{
    "accessory": "mqtt-temperature-tasmota",

    "name": "Spa Temperature",

    "url": "mqtt://(servernamehere)",
    "username": "",
    "password": "",

    "topic": "tele/spaswitch/SENSOR",

    "activityTopic": "tele/spaswitch/LWT",
    "activityParameter": "Online",

    "startCmd": "cmnd/spaswitch/TelePeriod",
    "startParameter": "120",

    "manufacturer": "ITEAD",
    "model": "Sonoff TH"
},
{
    "accessory": "mqtt-humidity-tasmota",

    "name": "Spa Humidity",

    "url": "mqtt://(servernamehere)",
    "username": "",
    "password": "",

    "topic": "tele/spaswitch/SENSOR",

    "activityTopic": "tele/spaswitch/LWT",
    "activityParameter": "Online",

    "startCmd": "cmnd/sonoff/TelePeriod",
    "startParameter": "120",

    "manufacturer": "ITEAD",
    "model": "Sonoff TH"
}
],
...
There are a few other plugins for other bits from the same guy, too. Nicely done Jaromir.
So now I have the switch and temperature wired up, I just need to wire it into the spa control, which is just an old-skool clock at present, and run the sensor over the edge. It'll also need a splash proof box, which I have spare from another project.
I'm going to wait for that bit until I have more time, incase it goes wrong and I need to wire the old one back in.
I have a few other uses for a temperature meter and switch - keeping the studio above "very cold" for a start. So I'll most likely be getting a few more TM16's for a few bits - water pump controller, heater controller. Or maybe a POW R2, which looks like a slightly cutdown version of the TM16 with a power meter on it.