This is a multipart post-mortem-style post series on the design and development of Nearest Bus. I'm planning on covering the architecture, design, code (this post), widget and possibly some on adding a watchkit app, once I finish that off.
Ah yes. The code part. I've not really covered it, but, from reading almost anything I've written in the past, you'd know I use and love the Xamarin set of tools - Xamarin.iOS in this case. This app is no exception - C# is still my native language, even tho I spend 8+ hours a day writing either Java or Objective C.
As I started this rewrite from scratch, I could have used this as a Swift learning exercise, however I'm not overly enamoured with Swift yet. I think it'll be big - it will replace Objective-C on iOS - but it's just not cooked enough yet. The spec keeps changing, it doesn't fit into Cocoa very well yet, and most of the "wow" features I've seen so far have been in other languages - C# mostly - for a number of years.
Yes, it's more functional than Objective-C, but adding a .map and .reduce method, and lambdas, doesn't make it a "functional language". Go look at Scala or F#.
Objective-C is growing on me, too, with a few exceptions which could be fixed by a better IDE (eg, merge .h/.m in the IDE). AppCode, which I use every day, goes a long way, but it's still not quite there.
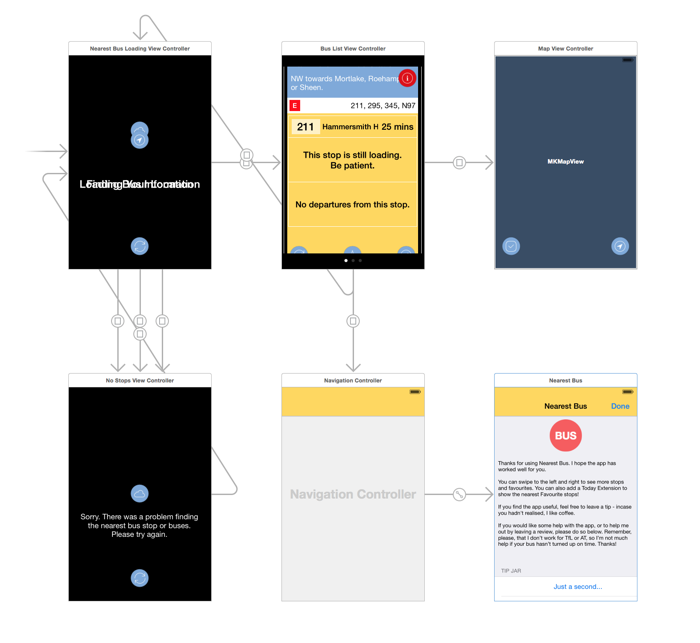
I made a decision early on to move from code-driven UI to storyboards. They are now Apple's recommended way of doing things, and unless you are a bit careless with your merging, they are pretty easy to deal with in Git. Nearest Bus is a pretty simple app - there are only 6 scenes in the storyboard, and only one developer - so it made sense. It also gave me an easy route to support multiple screen sizes (iPhone 4S, 5(S), 6, 6+) without much extra work.
Xamarin Studio comes with it's own Storyboard designer, but I chose not to use it - this was, to some degree, an exercise in learning more about Auto Layout and how it works in Xcode (poorly, it seams), so I can apply that to the day job. I can't attest to how good the Xamarin one is - or isn't - but it looks quite complete from a small amount of experimentation. Switching between then, however didn't work for me - the generated code isn't the same. The Xcode integration works well enough, however.
I chose not to use Size Classes on this project, but I could have done easily enough. Pretty much every element is full screen - or full-parent - so aside from resizing some of the cells so that they cover the whole screen, everything else was just normal Auto Layout.
Animations, while not the full Material Design type, were a bit of a focus for this app, and ended up being fair easy to do. I wanted a way of doing a progress indicator - whats the app doing while it's loading - and having the text fly in from the right, and exit via the left, with the icons dropping into the middle then falling to the bottom is quite a good way to convey this. It works better with the London data than the Auckland, as London uses 2 distinct steps - find location, and get stops over the network. The Auckland one really only has one step - find location - which takes any time. Getting the stops is a simple SQLite query, which takes only a few 10's of ms. The stops then load asynchronously as the user is looking at them in the card view.

Animation using Auto Layout constraints is pretty easy - just expose the constraint you want to change from the Storyboard, as you would with any other outlet, and manipulate its constant inside an animation block. Then call LayoutIfNeeded() at the end of the animation block, and it'll animate like normal.
AnimateEverythingOut ();
View.LayoutIfNeeded();

UIView.Animate (0.5, () => {
	AnimateFindYourLocationIn();
	View.LayoutIfNeeded();
}, () => {
	MessageHelper.Hub.PublishAsync (new RefreshLocationMessage (this));
});

nfloat IconHeight = 40;
nfloat LabelWidth = 300;

void AnimateEverythingOut()
{
	FindYouLocationCenterConstraint.Constant = -(UIScreen.MainScreen.Bounds.Width + LabelWidth);
	LoadingBusInfoCenterConstraint.Constant = -(UIScreen.MainScreen.Bounds.Width + LabelWidth);

	FindYourLocationIconCenterConstraint.Constant = UIScreen.MainScreen.Bounds.Height + IconHeight;
	LoadingBusInfoIconCenterConstraint.Constant = UIScreen.MainScreen.Bounds.Height + IconHeight;
	}

void AnimateFindYourLocationIn()
{
	FindYouLocationCenterConstraint.Constant = 0;
	FindYourLocationIconCenterConstraint.Constant = 0;
}

void AnimateFindYourLocationOut()
{
	FindYouLocationCenterConstraint.Constant = UIScreen.MainScreen.Bounds.Width + LabelWidth;
	FindYourLocationIconCenterConstraint.Constant = -(UIScreen.MainScreen.Bounds.Height + IconHeight);
}
I'm still working out and researching how to do some of the Material Design animations, especially the action button transforming into a full screen one. If you have any ideas, please share them.
Inside the app, all communication up the stack (from the bottom to the UI) is done with message passing. TinyMessenger provides an easy way to post a message and receive it in another part of the app. I found it's Unsubscribe call to be a bit flakey (basically, it didn't unsubscribe, so I ended up getting multiple calls to a given handler), but other than that, it works. I'd like to look at what Otto is doing in the Android space, and possibly use that approach, eg:
[Subscribe]
public void DoReactToMessage(SomeMessage message) {}

[Subscribe]
public void DoSomeOtherMessage(SystemMessage message) {}
Rather than attaching a lambda. Or maybe I should just fix TinyMessenger, as it works great otherwise.
For top down (the UI pulling things up from below), I've used a fairly normal IOC resolver
var favouriteProvider = MessageHelper.Container.Resolve<IFavouriteProvider>();
favouriteProvider.AddFavourite(...);
This even lets me register multiple providers, and just check if they are valid before using them (eg, AT and TfL will never be active at the same time).
This has it's own problems, as I then have double the code I need in memory - especially problematic in the very restrictive memory environment of a Today Extension. I need a way to unregister a class/type, which is something I may need to add to TinyIOC, so I can register the TfL provider, and have it deregister itself if it's not valid for use. Otherwise, I may have 10 providers in memory at a time, but only 1 is valid for use. Another option would be to have the first ILocationProvider register the appropriate handlers, as the user is not likely to switch cities with the app running.
I would have liked to look at using ReactiveUI in some way, but I ended up not doing so, mostly in an effort to ship the app, rather than just play with a new technology. That might come in a later rework, as I like the idea of Reactive, and I don't grok it enough yet.
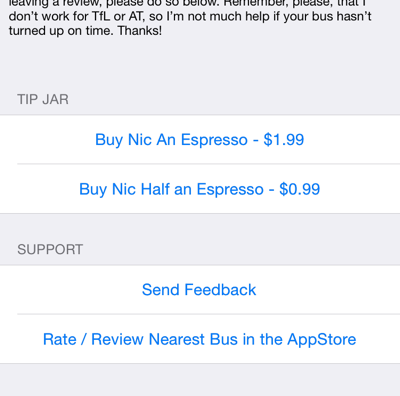
One of the cheeky features of the app is a Tip Jar, using In App Purchase (IAP). I was previously charging 69p (99c) for the app, but there were only a few sales every day, so I decided to find out how much interest there was without the cost - the answer being around 50x the interest! So I wanted to keep the app free to have as many people use it as possible, but still let them pay for it if they want to. Hence, the Tip Jar.
A few people have asked "Does apple allow this?". At the moment, they do, however I'm very clear in the UI that they are putting money in a tip jar, not actually buying something or unlocking some feature.
iOS provides StoreKit to do IAP, and Xamarin have a wrapper around this called Xamarin.InAppPurchase. It's an iOS-only component (which I suspect is why isn't not part of Xamarin.Mobile), and it makes doing IAP very easy, with a simple C# event model.
You basically setup your PurchaseManager, fire it some product id's to use, tell it to go get them from the store (it calls you back with the ones it got), and you call BuyProduct passing the product instance in.
The rest of the setup is normal IAP - you have to load the ID, name and price into iTunes Connect, and have it approved by Apple.
Once the user has done their thing, you get a callback saying it's done, with the receipt, or a call to the error handler to say it didn't work. It can even simulate the Appstore, as you can't use it in the iOS simulator (it has to be on a real device).
IAP has become a lot easier, too, with the use of TestFlight. If your app is being tested via TestFlight, your users can buy as many smurfberries as they like, and they will not be charged. By the same token, once the app is out of beta, they also will not get to keep things they bought. It makes the process of testing IAP really easy.
One of the things which tripped me up in the previous version of Nearest Bus was having too many event handlers attached to the singleton/static PurchaseManager. This time around, I've used methods rather than lambdas, so I can deregister the handlers when the IAP screen closes. So far, so good (but I wish .NET event handlers had an official way to say "clear all")
Some of the other components I'm using (either from NuGet or the Xamarin Component Store) are:
- sqlite-net, which is my go-to micro-ORM. It's used for the AT stops database, which is preloaded from their Google Transit data
- ModernHttpClient, which allows me to use HttpClient, but backend is on NSUrlSession (or OkHttp on Android)
- TinyIOC and TinyMessenger.
- NewtonSoft's Json.Net, which is pretty much the standard for Json these days. I need to have a look at SimpleJson, tho, and see if it's (lack of) size will give me some memory back.
- Xamarin Insights for analytics and crashreporting. It still a "work in progress", but it's functional for what I need. If you need more - especially cross language or mobile and web, go look at RayGun.io
In the last part (for the moment) I'm going to specifically look at the Today Extension (aka Widget), as that was also a major reason for rewriting the app.