This is a multipart post-mortem-style post series on the design and development of Nearest Bus. I'm planning on covering the architecture, design (this post), code, widget and possibly some on adding a WatchKit app, once I finish that off.
I mentioned some of the design decisions and priorities for the design of Nearest Bus in the overview. The main driving priority is
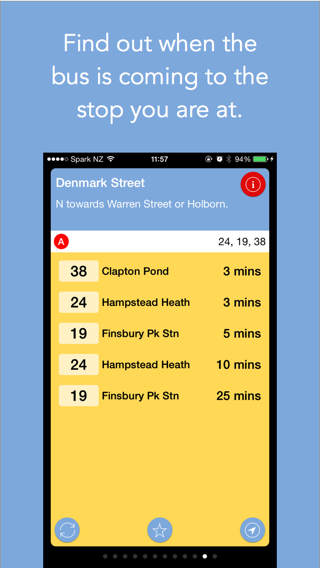
The app must be quick to use. I'm standing at a bus in the dark and it's raining, when's the bus coming?
Secondary to that is accessibility, which is an extension of the primary priority, but to people with visual impairments. Everything else follows these priorities. The look, feel, layout, and all other decisions.
For the functional and visual design, I have been quite taken by Googles Material Design language, which they have introduced recently in Android 5 / Lollipop. I like the ideas behind it, the concept of data sitting on pieces of "magic paper" and then manipulating the paper in 3D space. The use of 3D is subtle - unlike the older pre-iOS7 design style - and it makes sense to me as way to manipulate data which is sitting, otherwise flat, on a two dimensional surface.
To be honest, I find my reaction to Material to be a bit of a surprise. On an Android phone - Nexus 4 in my case - I find Material to be a bit bland and flat. On a Nexus 5, it's just "ok". But put the same design principles on an iOS device - Google Maps and Hangouts especially - and it's lovely. I wonder if it's something to do with the screens, colour reproductions or fonts on iOS being that much better - or just more pleasing and familiar to my eye.
On the opposite side of design, I use a Samsung S4 (or S5) for development at work. It feels like going back to Windows XP after using Windows 7 - a dumbed down Fisher Price interface with poor fonts and poorly thought out, garish colours. I wish any provider who used the "official" Android (not AOSP) was forced to release a ROM with just stock Android. Google has a few for some devices, but not nearly enough.
The app itself consists of only a few scenes in the storyboard
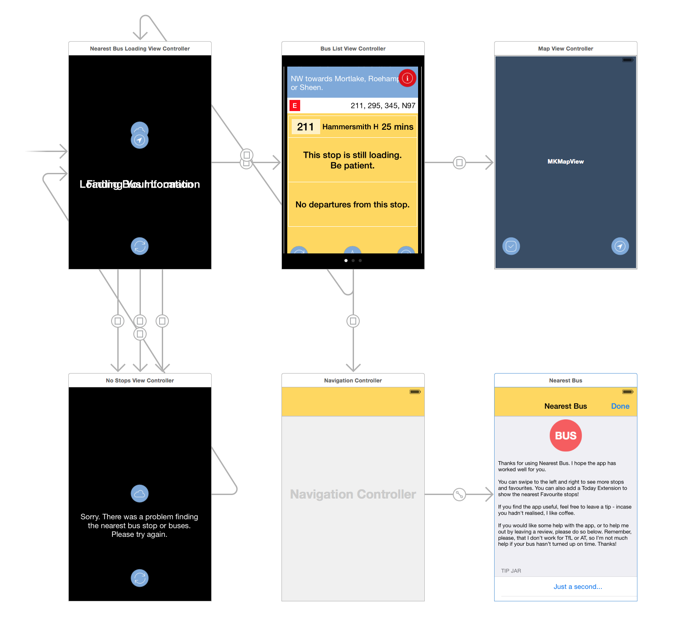
- The loading sequence, telling the user thats going on
- The list of stops, implemented as a
UICollectionView, which can be swiped from left to right. The user can interact with the buttons on the bottom (refresh, favourite, map) and the global information button at the top, as well as scroll the list of stops in the middle - The map, which shows the location of the stops around the user
- And a summary / app info screen, which doubles as the tip jar.
The app is put together with a single storyboard, which segues between the scenes. That allowed for very rapid iteration on the design, and I was able to get a non-functional (no real data), but usable prototype up very quickly.
As it often is, Auto Layout was both a blessing and a curse. It's allowed the app to work on everything from a 4S up to a 6+, but there are some bugs in it which are a bit frustrating, and the UI in Xcode leaves a lot to be desired.
Overall, its a lot better than doing the layout in code tho, which is how the old app used to work.
I've not gone fully in on the material design tho - the main missing part is in the animations. iOS doesn't have some of the animations pre-canned, unlike Android, so I elected to use some more basic animations like a simple crossfade for view transitions, or location-based animation (fly in, fly out etc). I may end up using this app as a test bed for animations, tho - having the map screen fly out of the map button would be nice to implement, even if it never ships.
Animation Inbox + Material Design from Jovie Brett.
I'd like to add an Action Button system to the app tho - I'm using a similar metaphor with the top info button which is persistent between stop screens, but if I follow materials design, it should be in the bottom right, where the map button is. That might need a bit more thought.
![]()
For the look, I did the assets in Sketch, which is very easy to use for most mobile assets. It's easy to draw at @1x resolution, then scale up without losing quality to @2x and @3x.
I can't recommend Sketch enough, it's worth investing the time in learning how to use it, even if you are "not a designer", like me. Meng To' course Learn Sketch 3, on using Sketch and Xcode, is worth getting if you are totally new to it. It covers both the design side, as well as coding, so it's quite suitable for developers wanting to learn design, and designers who want to learn some code.
For bitmap editing - and I didn't do much of that in this app - I've fully switched over to Pixelmator, from Photoshop. The main reason was cost: I needed a photo editor on both my laptops, and we only had one Photoshop license (you can install PS on 2 machines - Leonie had one already as she uses Photoshop a lot more than me, for actual photo editing).
Pixelmator took a bit of getting used to - I've been a Photoshop user since the mid-90's - but it was worth persisting with. It doesn't have every bell and whistle of Photoshop, but it has enough to be a replacement for me, and I still only use a small percentage of what it can do.
Remember the complaint of "Microsoft Word would be so much better if it only had the bits I needed" - well, Pixelmator is like that, vrs Photoshop.
For $130 (USD), total, you can get all the design tools you need. Bargain.
One feature I wanted to add - and will in a future version - is a view of the favourites, from nearest to furthest. It's not as important in London, where there is only a few areas which have a very high concentration of stops (eg Hammersmith Bus Station only has about 8 stops), where as Auckland has a much, much higher concentration in areas like Britomart Bus Depot.
The main reason I've not put it in yet is I've not worked out how to fit it in. I'd need to change how the info button works, most likely, or add a 4th button to the bottom, which I don't want to do. I'm still throwing around the how and where.
In the next part, I'm going to look at the code, and how the app is put together.