One of the more interesting parts of Earnest was that it was highly visual, and well designed. The FreeAgent folks didn't want to use any (or many) of the standard iOS styles, and wanted the app to follow their new branding and style that they have developed for the visual update of FreeAgent.
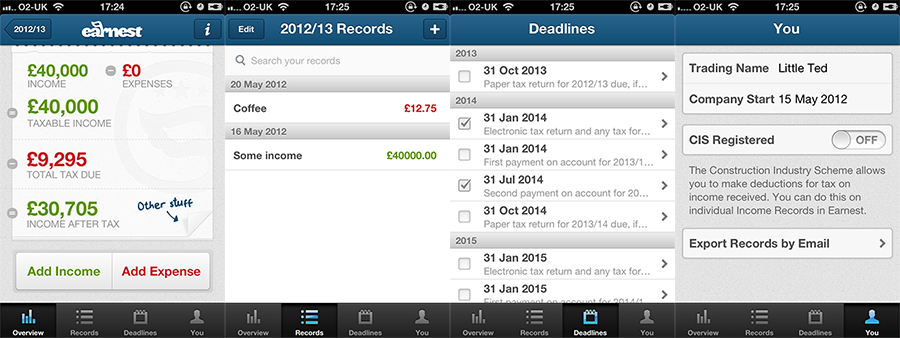
The app is designed for very small businesses (usually sole-traders) who are under the VAT limit (73k). It lets them easily track their income, expenses and estimated tax liability, and combined with the new HMRC rules around 3-line accounting (income, expenses, gross profit), the government is hoping this will increase the compliance by those at the tiny end of the market.
If you want to try Earnest out, it's a free download from the AppStore.
From a development point of view, this project took about a month of full-time development, over 4 months. It was done in MonoTouch, and made extensive use of MonoTouch.Dialog.
There were two main areas I want to cover that came out of the development of Earnest: use of iOS5 UIAppearence apis, and some deep customisation of MonoTouch.Dialog to change the default rendering on table cells. I'll also cover a little bit of how to integrate animations into existing components.
We decided from the start that while the application should work on iOS4 (4.3 to be exact - the last one that the iPhone 3G can run), we should focus on iOS5 as much as possible.
The normal iOS method of doing OS-version-specific code involves just not calling the methods which are not available on the older versions, so I ended up with a lot of "if (version 5) do something" type code. The code for checking the version, however, is quite simple
public static bool IsIOS41OrBetter
{
    get
    {
        string version = UIDevice.CurrentDevice.SystemVersion;
        string[] versionElements = version.Split('.');

        if (versionElements.Length > 0)
        {
            int versionInt = 0;
            int minorVersion = 0;
            if (Int32.TryParse(versionElements[0], out versionInt))
            {
                if (Int32.TryParse(versionElements[1], out minorVersion))
                {
                    if (versionInt >= 5) return true;

                    return (versionInt >= 4 && minorVersion >= 1);
                }
            }

            return false;
        }
        return false;
    }
}

public static bool IsIOS5OrBetter
{
    get
    {
        string version = UIDevice.CurrentDevice.SystemVersion;
        string[] versionElements = version.Split('.');

        if (versionElements.Length > 0)
        {
            int versionInt = 0;
            int minorVersion = 0;
            if (Int32.TryParse(versionElements[0], out versionInt))
            {
                if (Int32.TryParse(versionElements[1], out minorVersion))
                {
                    if (versionInt >= 5) return true;
                }
            }

            return false;
        }

        return false;
    }

}
After that, you can do things like:
public static void SetAppearance()
{
    if (Util.IsIOS5OrBetter)
    {
       //do some stuff here
    }
}
It's not elegent, but it works well, and beats the "I've built it for X, so it'll work on X+1, without any new stuff", or "it's build for Y, so Y-1 will not work at all". Anyone with a keen eye will see that the output of this could (should) be cached, as once the application is running, the iOS version can never change.
UIAppearence
For the first time since I started writing iOS applications, I had access to a proper, real-life (scottish-talking) designer, in the form of Robbie Manson, the resident designer at FreeAgent. He designed the interface and flow of Earnest, and I can't recommend highly enough finding a good designer. Of all the developers (or designers) I know, I only know 2 people who are really capable of doing both design - UI, UX, pixel pushing - and coding to a high standard. There is something about design and development: they go together, but seldom in the same person.
Two of the main sections that were customised in Earnest were the UINavigationController, and the UITabBarController. As I said above, we decided early on to focus on iOS5, and just "make it work" in iOS4, so I was able to use the UIAppearence APIs (which MonoTouch supports with strongly typed classes/properties).
if (Util.IsIOS5OrBetter)
{
	UINavigationBar.Appearance.SetBackgroundImage(Resources.NavBarHeaderBackground, UIBarMetrics.Default);

	UIBarButtonItem.Appearance.SetBackgroundImage(Resources.BarButtonNormal.CreateResizableImage(new UIEdgeInsets(0,5,0,5)), UIControlState.Normal, UIBarMetrics.Default);
	UIBarButtonItem.Appearance.SetBackgroundImage(Resources.BarButtonActive.CreateResizableImage(new UIEdgeInsets(0,5,0,5)), UIControlState.Highlighted, UIBarMetrics.Default);

	UIBarButtonItem.Appearance.SetBackButtonBackgroundImage(Resources.BarButtonBackNormal.CreateResizableImage(new UIEdgeInsets(0,15,0,5)), UIControlState.Normal, UIBarMetrics.Default);
	UIBarButtonItem.Appearance.SetBackButtonBackgroundImage(Resources.BarButtonBackActive.CreateResizableImage(new UIEdgeInsets(0,15,0,5)), UIControlState.Highlighted, UIBarMetrics.Default);

	UITabBar.Appearance.SelectionIndicatorImage = Resources.TabBarSelectedImage;
	UITabBar.Appearance.BackgroundImage = Resources.TabBarBackgroundImage;
}
While this code doesn't cover all the customisations I did, the total lines of code to change all the required items was one method, and about 20 lines. This beats the other option, which is to inherit from UINavigationBar and override the drawRect: method.
The result was quite striking:

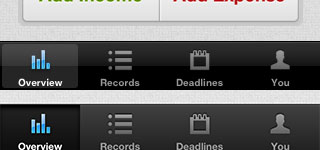
You can see the iOS 5 header at the top, and in the tabbar at the bottom. The iOS4 versions just use the existing TintColor on the header, and nothing on the tabbar.
I can't recommend this method highly enough. It ment I could focus on the iOS5 version, and making it perfect, while knowing that it will still work on iOS4.
On a side note, I'm also using the UIImage.CreateResizableImage method, which allows you to make a small image (eg a button) and have it scale up in a sensible way. Miguel de Icaza details it more here.
Custom Sections in MonoTouch.Dialog.
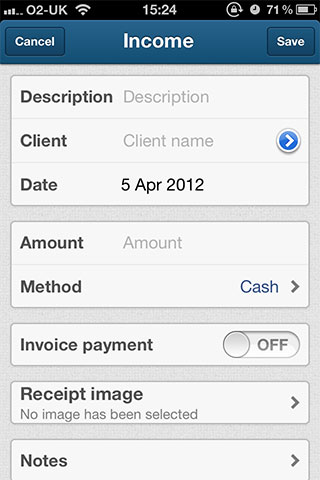
One of the design elements that Robbie came up with involved changing how the standard Grouped UITableView cells looked. He wanted a much smaller corner radius, a different drop shadow, and a different coloured line, all of which matches the new FreeAgent design language.
To do this, I inherited from Section, and added a CustomizeCell method into the base:
using System;
using MonoTouch.Dialog;
using MonoTouch.UIKit;
using Earnest.Common;
using Earnest.Library.Database;
using System.Threading.Tasks;
using System.Drawing;

namespace Earnest.Library
{
	public class BTBackgroundImageSection : Section
	{

		public BTBackgroundImageSection(string header) : base(header){}
		public BTBackgroundImageSection(string header, string footer) : base(header, footer) {}
		public BTBackgroundImageSection() : base(null, BaseDialogViewController.MakeEmptySectionFooter()) {}
		public BTBackgroundImageSection(UIView header) : base(header)
		{

		}

		public BTBackgroundImageSection(UIView header, UIView footer) : base(header, footer)
		{
		}

		public override UITableViewCell CustomizeCell (UITableViewCell cell, MonoTouch.Foundation.NSIndexPath indexPath)
		{
			var theCell = base.CustomizeCell (cell, indexPath);

			if (!Util.IsIOS5OrBetter) return cell;

			if (Count == 1)
			{
				theCell.BackgroundView = new UIImageView(Resources.CellBackgroundFull.CreateResizableImage(new UIEdgeInsets(5,5,5,5)));
				theCell.SelectedBackgroundView = new UIImageView(Resources.CellBackgroundFullActive);

			} else if (indexPath.Row == 0)
			{
				theCell.BackgroundView = new UIImageView(Resources.CellBackgroundTop.CreateResizableImage(new UIEdgeInsets(5,5,2,5)));
				theCell.SelectedBackgroundView = new UIImageView(Resources.CellBackgroundTopActive);

			} else if (indexPath.Row+1 == this.Count)
			{
				theCell.BackgroundView = new UIImageView(Resources.CellBackgroundBottom.CreateResizableImage(new UIEdgeInsets(0,5,5,5)));
				theCell.SelectedBackgroundView = new UIImageView(Resources.CellBackgroundBottomActive);
			} else
			{
				theCell.BackgroundView = new UIImageView(Resources.CellBackgroundMiddle.CreateResizableImage(new UIEdgeInsets(2,5,2,5)));
				theCell.SelectedBackgroundView = new UIImageView(Resources.CellBackgroundMiddleActive);
			}
			return theCell;

		}
	}
}
There are 4 separate situations here
- A cell on it's own, which has rounded top and bottom, using it's own image.
- A top cell, which has a background of just a top rounded edge
- A middle cell, with no rounding at ll
- A bottom cell, with rounding on the bottom edges and a drop shadow.
We had one image for each of these states, tho it might be possible to do it using manual drawing.
I also extended DialogViewController (in MonoTouch.Dialog) to call this when it was building each cell.
public override UITableViewCell GetCell (UITableView tableView, MonoTouch.Foundation.NSIndexPath indexPath)
{
	var section = Root.Sections [indexPath.Section];
	var element = section.Elements [indexPath.Row];

	var cell = element.GetCell (tableView);
	// added this in, so we can change each cell if needed
	return section.CustomizeCell(cell, indexPath);
}
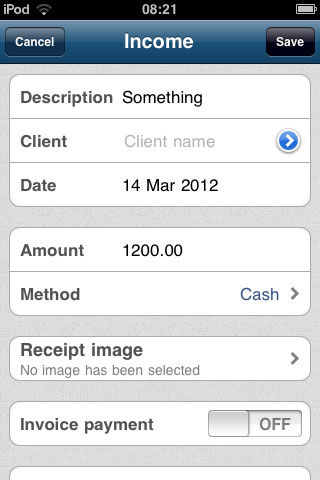
Again, the results work in both iOS4 and 5, but look a lot better in iOS5. I'm not sure I got them pixel-perfect to the designs, but it is very close.
Focused UISearchBar
MonoTouch.Dialog provides a search facility, which works very well, and makes use of the iOS standard UISearchBar. Earnest uses this, with a couple of tweeks (outside of the visual changes, which were just part of the UIAppearence settings above)
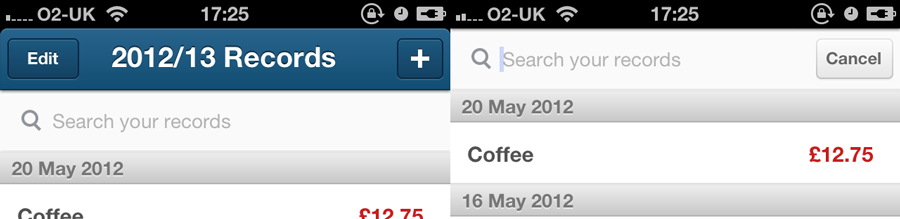
When you tap in the search box, the UINavigationBar animates away, allowing the user to focus on searching, making it quite modal without preventing the user from doing other things.
This sounds difficult, but iOS makes it very easy to do. In the MT.D's DialogViewController, there is a SearchDelegate. This delegate has methods which are called when searching starts, and when the cancel button is pressed (we wanted the user to explicitly exit search). Adding a simple animation in there removes - and adds - the Navigation bar.
class SearchDelegate : UISearchBarDelegate {
	DialogViewController container;
	RectangleF originalFrame, searchFrame;

	public SearchDelegate (DialogViewController container)
	{
		this.container = container;
		originalFrame = container.NavigationController.View.Frame;
		float navBarHeight = 44f;
		searchFrame = new RectangleF(new PointF(originalFrame.Location.X, originalFrame.Location.Y - navBarHeight),
			new SizeF(originalFrame.Size.Width, originalFrame.Size.Height + navBarHeight));
	}

	public override void OnEditingStarted (UISearchBar searchBar)
	{
		UIView.BeginAnimations ("animatesearch");
		UIView.SetAnimationDuration (0.25);
		container.NavigationController.View.Frame = searchFrame;
		UIView.CommitAnimations ();

		searchBar.ShowsCancelButton = true;
		container.StartSearch ();
	}

	public override void OnEditingStopped (UISearchBar searchBar)
	{
	}

	public override void TextChanged (UISearchBar searchBar, string searchText)
	{
		container.PerformFilter (searchText ?? "");
	}

	public override void CancelButtonClicked (UISearchBar searchBar)
	{
		UIView.BeginAnimations ("animatesearch");
		UIView.SetAnimationDuration (0.15);
		container.NavigationController.View.Frame = originalFrame;
		searchBar.Text = "";
		searchBar.ResignFirstResponder ();

		UIView.CommitAnimations ();

		searchBar.ShowsCancelButton = false;
		container.FinishSearch ();

	}

	public override void SearchButtonClicked (UISearchBar searchBar)
	{
		//searchBar.ResignFirstResponder();
		//searchBar.ShowsCancelButton = true;

		searchBar.ResignFirstResponder();
		container.SearchButtonClicked (searchBar, searchBar.Text);
	}
}
The two bits of interest are the following:
//hide the NavigationController, just move it offscreen!
UIView.BeginAnimations ("animatesearch");
UIView.SetAnimationDuration (0.25);
container.NavigationController.View.Frame = searchFrame;
UIView.CommitAnimations ();

//Show it again
UIView.BeginAnimations ("animatesearch");
UIView.SetAnimationDuration (0.15);
container.NavigationController.View.Frame = originalFrame;
UIView.CommitAnimations ();
Animations in iOS are very easy to do with the UIKit properties which are CoreAnimation aware (most are), and it gives your app a very polished, "Apple" feeling.
There is a lot more that I did in Earnest to get it looking "just right", but this covers most of the nitty-gritty. In general, if you have to do something in CocoaTouch, assume Apple has provided it already, rather than having to re-invent it yourself.
Version 2 of Earnest is under way, which is "more of the same" - extending it to cover the areas we wanted to do on day one, but didn't have time to do.
If you want to try Earnest out, it's a free download from the AppStore. If you have any questions about how we did it, feel free to email me or leave a comment.